If you use the “Button” block in the Gutenberg editor and click on the styles tab, you’ll see options for “Fill” or “Outline” styles. But what if you want to add more style options? Or what if you want to add custom style options to other blocks? Should you develop a completely new block just for a simple style variation? Actually, it doesn’t need to be that complicated. In this article, I will show you how to add custom style options to existing blocks, simplifying your workflow.
How to Register a New Block Style
To register a new block style using PHP, we need to use the register_block_style function. This function requires two parameters: $block and $style_properties. The $block parameter specifies the block you want to add the custom style to, and $style_properties specifies the properties of the custom style.
Here is an example of adding a new “Plain” style to the core List block:
function wprs_register_block_styles() {
register_block_style(
'core/list',
[
'name' => 'list-plain',
'label' => 'Plain',
]
);
}
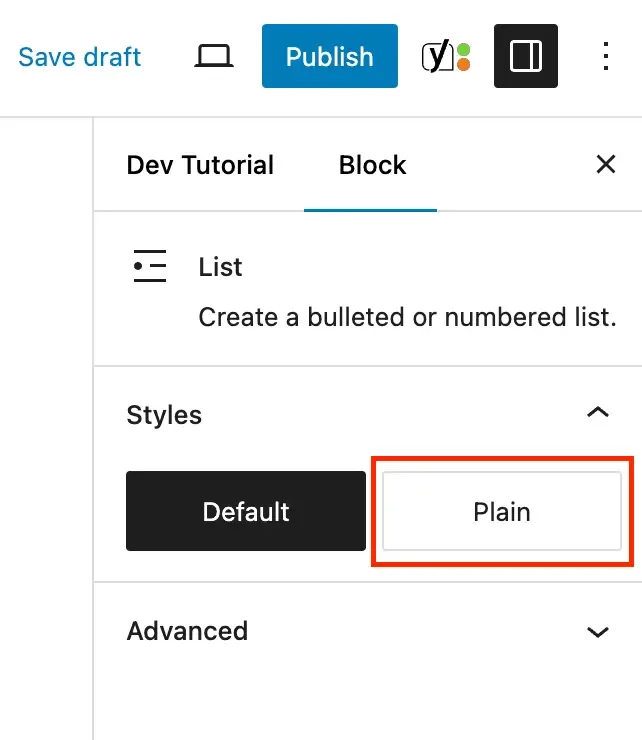
add_action( 'init', 'wprs_register_block_styles' );After adding the code above, when using the List block, you will see a “Plain” style option in the sidebar, as shown below:
In the example above, I used core/list as the $block parameter instead of just list. All default WordPress block names are prefixed this way. If you are unsure of the correct name for a block, check out the full list of all WordPress core blocks.
We provided two required properties for the custom style: name and label. The label is the text displayed in the Gutenberg editor interface, while the name is used to generate the CSS class name added to the block in the format is-style-{name}.
So far, we’ve learned how to register custom block styles so they appear in the editor. However, this won’t actually make your block look different yet because we haven’t added the CSS code for these styles. The next step is to add the necessary CSS for the specific class name.
Styling Your Custom Block Styles with CSS
When you select a block style, WordPress inserts a class name in the format is-style-{name} into the block’s class attribute. We can use this class to target the element with CSS.
For example, if we want to add a checkmark list style, we can register it like this:
function wprs_register_checkmark_list_style() {
	register_block_style(
		'core/list',
		[
			'name'  => 'list-checkmark',
			'label' => 'Checkmark',
		]
	);
}
add_action( 'init', 'wprs_register_checkmark_list_style' );
Then, you can add the following CSS to your site to apply the custom checkmark style to the list:
@counter-style checkmark {
  system: cyclic;
  symbols: "2713";
  suffix: " ";
}

.wp-block-list.is-style-list-checkmark {
  list-style: checkmark;
}
Simply add this CSS to your theme’s style.css file or the WordPress Customizer settings, and the style will display correctly on the front end of your site.
Adding Custom Styles to the Block Editor
To go a step further, you should also register the CSS so that it appears within the block editor itself. This way, you can see the style changes in real-time while editing.
There are two ways to register CSS alongside your block style:
- External Stylesheet: You can pass a
style_handleproperty to theregister_block_stylefunction, containing the name of a registered stylesheet. WordPress will then automatically load this CSS file when the block is used. - Inline CSS: You can use the
inline_styleproperty to directly provide the CSS for the custom block style.
The following example demonstrates both methods:
function wprs_register_block_styles_with_css() {
// Method 1: Loading a registered stylesheet
register_block_style(
'core/list',
[
'name' => 'list-example-one',
'label' => 'Example One',
'style_handle' => 'list-example-one-style-handle'
]
);
// Method 2: Adding inline CSS
register_block_style(
'core/list',
[
'name' => 'list-example-two',
'label' => 'Example Two',
'inline_style' => '.wp-block-list.is-style-list-example-two { list-style: square; }',
]
);
}
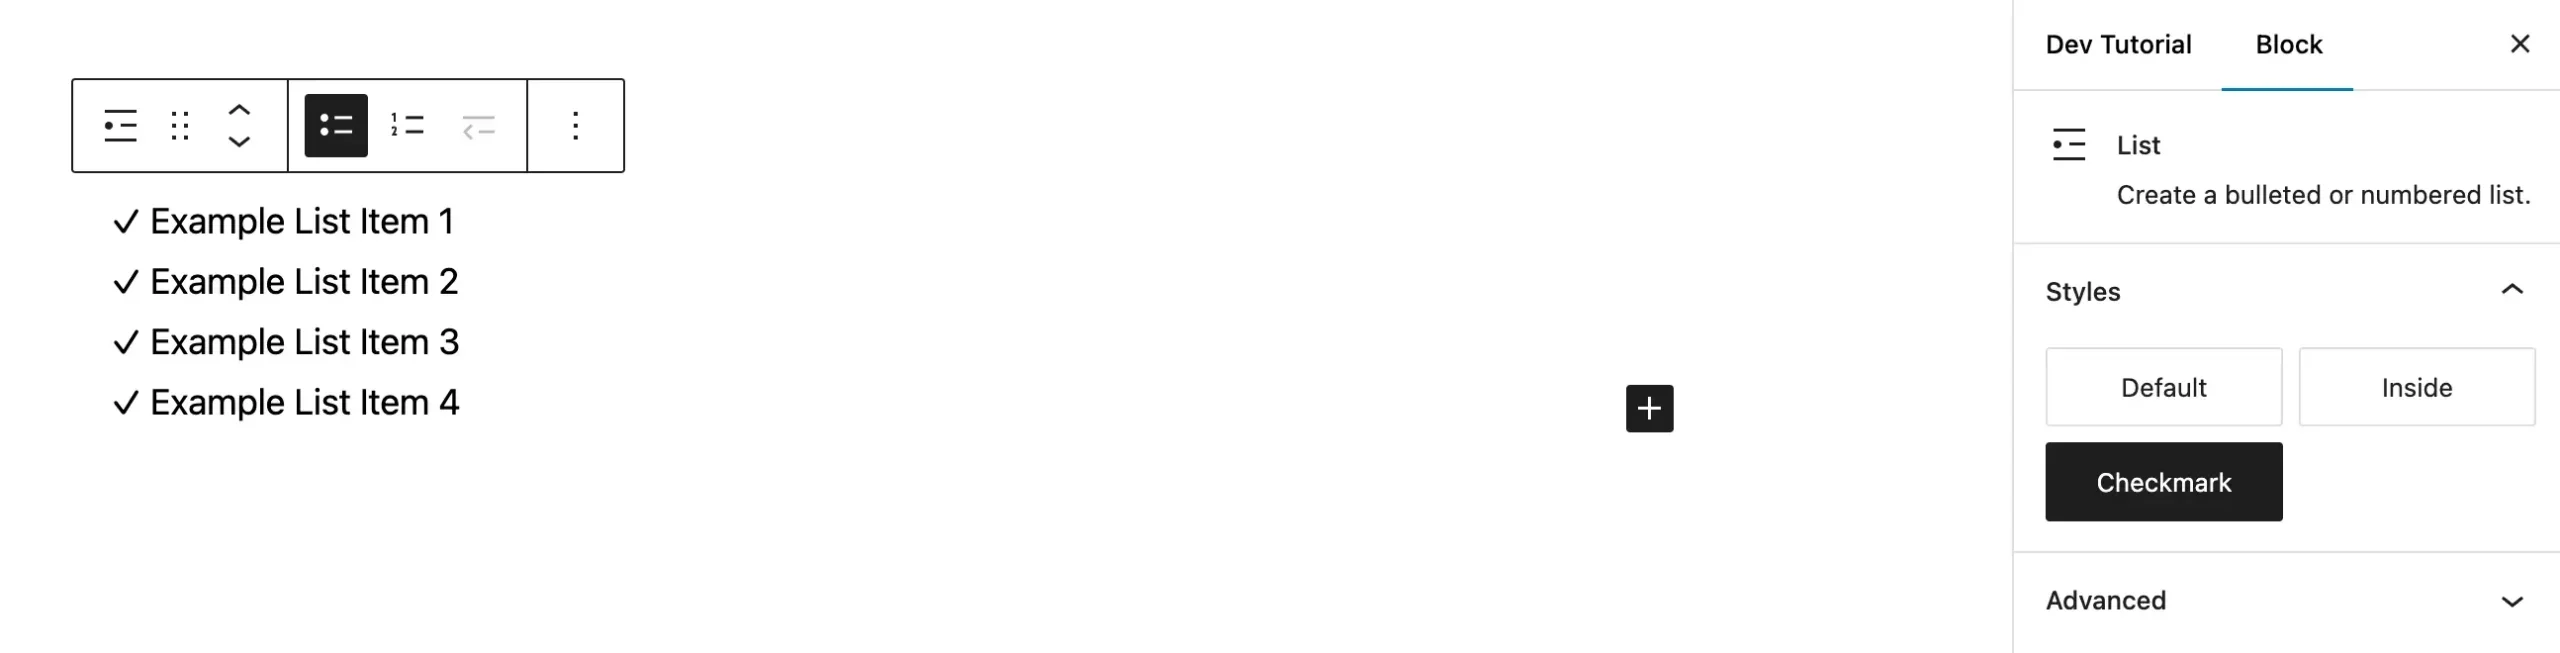
add_action( 'init', 'wprs_register_block_styles_with_css' );If the custom CSS is simple, I recommend using the inline_style property. This makes your site faster as it avoids loading extra external files. After adding the CSS, selecting the “Checkmark” style will result in a list like the one shown below:
How to Set a Custom Style as the Default
While not always recommended, you can set a custom style as the default by adding the is_default property, like this:
register_block_style(
	'core/list',
	[
		'name'       => 'list-new-default',
		'label'      => 'New Default',
		'is_default' => true,
	]
);
Now, whenever you insert the target block (the List block in this case), your custom style will be applied by default.
Note: When a custom style is set as default, WordPress does not add the is-style-{name} class to the block. You will need to ensure your default styles are already defined in your theme’s main CSS.
In this tutorial, we’ve covered how to add custom style options to existing blocks. With this foundation, you can easily customize core WordPress blocks to fit your theme or plugin’s needs without having to develop entire new blocks from scratch.