By default, WooCommerce requires customers to visit a single product page to select variations. In this tutorial, I will show you how to create custom variation dropdowns directly on WooCommerce product list (archive) pages. This streamlines the shopping experience by allowing customers to choose attributes and add specific variations to their cart without leaving the shop page.
Our goal is to ensure that the AJAX “Add to Cart” functionality works seamlessly with these custom dropdowns, updating prices and images dynamically.
Here is a preview of the functionality we will build:
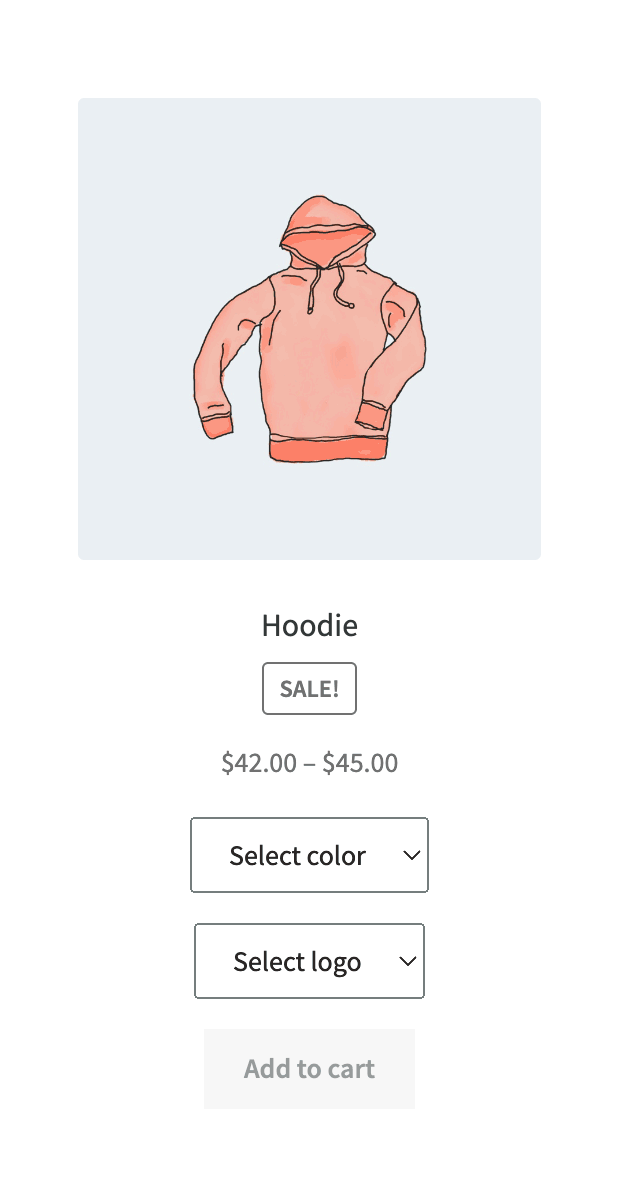
Step 1: Modifying the Add to Cart Button HTML
First, we need to use the woocommerce_loop_add_to_cart_link hook. This hook allows us to replace the standard “Select options” button with our custom dropdown interface for variable products, while leaving simple products untouched.
add_filter( 'woocommerce_loop_add_to_cart_link', 'wprs_select_variations_shop_page', 99, 2 );

function wprs_select_variations_shop_page( $add_to_cart, $product ) {

	// Do nothing if it's not a variable product
	if( ! $product->is_type( 'variable' ) ) {
		return $add_to_cart;
	}

	// Do nothing if there are no available variations
	if( ! $variations = $product->get_available_variations() ) {
		return $add_to_cart;
	}

	ob_start();
	?>

	<div class="wprs_variations" data-product_variations="<?php echo wc_esc_json( wp_json_encode( $variations ) ) ?>">

		<?php
			foreach( $product->get_attributes() as $attribute_name => $attribute ) :
				?>
					<div class="wprs-variation-select value">
						<?php
							wc_dropdown_variation_attribute_options(
								array(
									'show_option_none' => 'Select ' . strtolower( wc_attribute_label( $attribute_name ) ),
									'options'          => $attribute->get_slugs(),
									'attribute'        => $attribute_name,
									'product'          => $product
								)
							);
						?>
					</div>
				<?php
			endforeach;
		?>

		<a href="" data-product_id="" class="disabled button add_to_cart_button">Add to cart</a>

	</div>
	<?php

	return ob_get_clean();

}
Technical Breakdown:
- We store the entire
$product->get_available_variations()array in a data attribute. This is exactly how WooCommerce handles it on single product pages. For production, you might want to sanitize this array to only includeattributes,variation_id,price_html, andimageto reduce HTML payload. - We use
ob_start()andob_get_clean()becausewc_dropdown_variation_attribute_options()echoes the HTML immediately, but the filter requires us to return a string. - The “Add to Cart” button starts without a
data-product_idand has adisabledclass. We will populate these using JavaScript once a valid variation is selected.
Step 2: Implementing Interactive Logic with JavaScript
Now that we have the HTML structure, we need JavaScript to listen for changes in the dropdowns, find the matching variation_id, and update the UI (price and image) accordingly.
jQuery( function( $ ) {

	$( '.wprs-variation-select' ).find( 'select[data-attribute_name]' ).change( function() {

		const el = $(this);
		const variationsWrapper = el.closest( '.wprs_variations' );
		const availableVariations = JSON.parse( variationsWrapper.attr( 'data-product_variations' ) );
		const productWrapper = variationsWrapper.closest( 'li.product' );
		const button = productWrapper.find( 'a.add_to_cart_button' );

		let matchingVariation = {};

		// Iterate through available variations to find the one matching selected attributes
		for( let i = 0; i < availableVariations.length; i++ ) {
			matchingVariation = availableVariations[i];

			for( const [ attr_name, attr_value ] of Object.entries( availableVariations[i].attributes ) ) {
				if( attr_value !== "" && attr_value !== variationsWrapper.find( '[name="' + attr_name + '"]' ).val() ) {
					matchingVariation = {};
				}
			}

			if( Object.keys( matchingVariation ).length !== 0 ) {
				break;
			}
		}

		// If a valid variation ID is found, enable the AJAX button
		if( matchingVariation.variation_id ) {
			button.removeClass( 'disabled' ).addClass( 'ajax_add_to_cart' );
			button.attr( 'data-product_id', matchingVariation.variation_id );
		} else {
			button.addClass( 'disabled' ).removeClass( 'ajax_add_to_cart' );
			button.attr( 'data-product_id', '' );
		}

		// Dynamically update the product price
		if( matchingVariation.price_html ) {
			productWrapper.find( 'span.price').replaceWith( matchingVariation.price_html );
		}

		// Dynamically update the product thumbnail
		if( matchingVariation.image ) {
			productWrapper.find( 'img' ).attr( {
				src: matchingVariation.image.src,
				srcset: matchingVariation.image.srcset,
				width: matchingVariation.image.src_w,
				height: matchingVariation.image.src_h
			} );
		}

	} );

} );
Summary
If your theme doesn’t support variation selections on the shop page, you can easily implement this feature with the hooks provided above. By using the standard WooCommerce ajax_add_to_cart class, we ensure compatibility with existing WooCommerce AJAX behaviors without writing complex custom handlers.
This implementation provides a “premium” feel to your store by reducing friction in the buying process. If you have any questions about extending this to support “Any attribute” configurations or custom variation swatches, feel free to leave a comment below.