It’s common knowledge that WordPress consumes relatively more server resources, especially with some advanced WordPress themes. If not properly optimized, site loading speeds can become frustratingly slow.
Anyone dedicated to building a site knows that loading speed impacts SEO and conversion rates. For those running paid ads, speed is quite literally money.
Today, we’ll use the Avada theme as an example to explain in detail how to properly optimize a WordPress site and improve site loading speed.
1. Remove Unnecessary Frontend Files
The Avada theme provides options that allow us to disable unnecessary features to reduce the files loaded on the frontend, thereby reducing the number of HTTP requests. The configuration method is as follows:
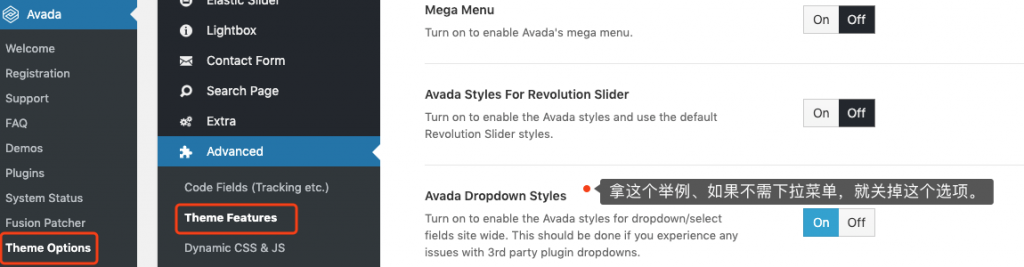
In the Theme Options submenu under the Avada menu in the backend, find Advanced -> Theme Features. Carefully read the introduction for each option. If your site doesn’t use a certain feature, turn it off.
| Importance | 5 points |
| Difficulty | 1 |
2. Increase Browser Cache Validity Period
Browsers can cache static resources like images, CSS, and JavaScript—which don’t need server processing—on the visitor’s computer. When the visitor opens the page again, they don’t have to request the server again but instead read these resources directly from their own computer.
Browser cache has a validity period. Once it expires, the browser will re-download the expired resources from the server. For static resources that don’t need frequent modification, increasing the cache validity period can reduce the number of resource re-downloads. Google recommends setting the validity period for these static resources to 1 year or more; we can follow this recommendation.
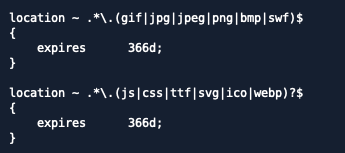
In the Nginx main configuration file, find the following configuration items and set them as shown in the screenshot. I don’t have an Apache server on hand, so I won’t cover the Apache setting method here. Friends who need it can easily find it via Google or consult their hosting provider.
| Importance | 10 points |
| Difficulty | 3 |
3. Use Efficient Caching Plugins
If you want to speed up WordPress, using server caching is an indispensable step. According to where the cached content is stored, WordPress caching can be categorized into three main types: memory caching, disk caching, and database caching. In terms of cache read speed: memory caching > disk caching > database caching.
The popular WP Super Cache uses disk caching. There are many tutorials for WP Super Cache online, so I won’t re-introduce it here.
Here I’ll recommend a relatively niche caching plugin—Cachify. This plugin simultaneously supports saving cache in Memcached (a type of memory database), disk, and database. At the same time, the setting options provided by this plugin are very simple, avoiding opposite effects due to misconfiguration.
If the server supports Memcached, it’s recommended that everyone use the Cachify plugin to save the cache in memory for the best speed optimization effect. For specific setting methods, please refer to: https://wphrefs.com/use-the-cachify-plugin-to-cache-wordpress-pages-in-memcached-for-instant-loads/
| Importance | 15 points |
| Difficulty | 5 |
4. Use HTTP/2
One important principle for optimizing site loading speed for HTTP 1.x is: reduce the number of HTTP requests to lower resource blocking caused by browser concurrent request limits. Reducing the number of HTTP requests necessitates merging files, and the problem with merging files is that the files become larger, which in turn leads to increased download time.
How to balance between reducing request counts and increased download times due to larger files is a difficult problem. After the popularity of HTTP/2, this problem no longer exists. An important feature of HTTP/2 is multiplexing—simply put, if HTTP 1.x can download 6 files simultaneously, the number of files HTTP/2 can download simultaneously might be 60. In this case, the significance of reducing HTTP requests is no longer that great (appropriately reducing HTTP requests still helps improve site speed, as long as it doesn’t lead to merged files being too large).
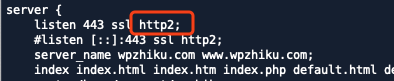
Most modern browsers already support HTTP/2. We only need to enable HTTP/2 support on the server to take advantage of this feature to speed up site loading. The enablement method is simple; refer to the image below for adding a setting in Nginx.
If you can’t configure it yourself, you can contact your hosting provider to perform the setup. HTTP/2 can save server resources, so I believe any proactive hosting provider would be very happy to help you set it up.
If you’ve confirmed your server already supports HTTP/2, you can turn off JS Compiler in Avada settings to speed up site loading.
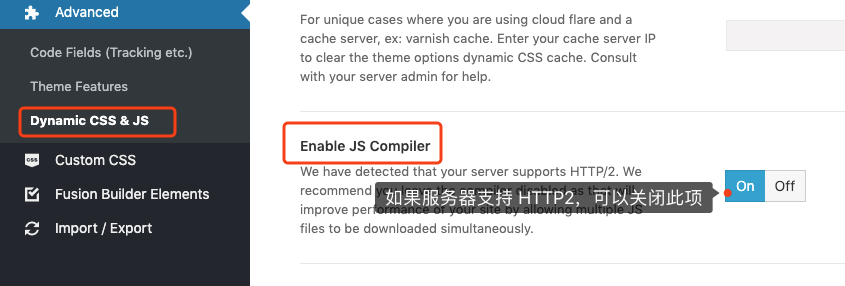
Note: Turning this off might lead to lower scores from PageSpeed or other site speed testing tools because these tools haven’t been optimized for HTTP/2 yet; it’s not that the site loading speed actually decreased.
| Importance | 20 points |
| Difficulty | 3 |
5. Deploy PageSpeed Component (+30)
The PageSpeed server component can automatically perform multiple optimizations for web pages (such as JS lazy loading, image lazy loading, image compression, etc.) to improve page loading speed. Deploying PageSpeed on the server is an optimization measure that yields twice the result with half the effort. Due to length constraints, the specific deployment method won’t be expanded upon here. Friends with the capability can refer to the following link for setup: https://wphrefs.com/use-ngx-pagespeed-to-optimize-front-end-pages-and-speed-up-wordpress/. If you can’t do it, asking your hosting provider or professional technical personnel for help is also an option.
| Importance | 20 points |
| Difficulty | 5 |
6. Use a CDN to Separate Site Static Resources
A CDN can cache site static resources on servers closer to visitors to help them open these resources quickly. CDNs are divided into two types: full-site CDNs and static resource CDNs. Cloudflare is a full-site CDN model, while KeyCDN and CDN77 are static resource CDN models.
For WordPress sites, it’s recommended that everyone use a static resource CDN—accessing static resources like images, JS, and CSS via the CDN, while dynamic pages generated via PHP still access the origin site. This can avoid opening speed slowdowns caused by CDNs transmitting unnecessary Cookies.
CDN setup is simple. After obtaining the CDN address from the provider, refer to the method in the following link for setup: https://wphrefs.com/wp-cdn-rewrite-qiniu-colud/
Commonly used international static resource CDNs include KeyCDN, CDN77, etc.
Commonly used domestic static resource CDNs include Alibaba Cloud CDN, Tencent Cloud CDN, Qiniu Cloud, UCloud, etc.
| Importance | 20 points |
| Difficulty | 3 |
7. Don’t Host Videos on Your Own Site
Some sites feature company and product introductions; many sites will first upload the video to YouTube and then add it to their own site. While YouTube-hosted videos play fast enough, adding them to your site loads extra JS, which can slow down your site speed to some extent.
If you only need a few videos on your site and your server traffic is sufficient, you can completely upload the videos to your own site. This avoids loading YouTube’s JS, thereby speeding up the site’s opening speed.
Adding videos in WordPress is very simple; just insert the video directly into the WordPress text editor like you upload an image. Take the Avada theme as an example. First, we add a “Text Block” in Fusion Builder.
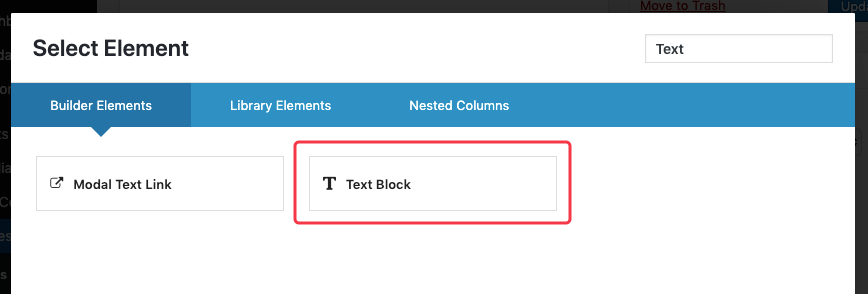
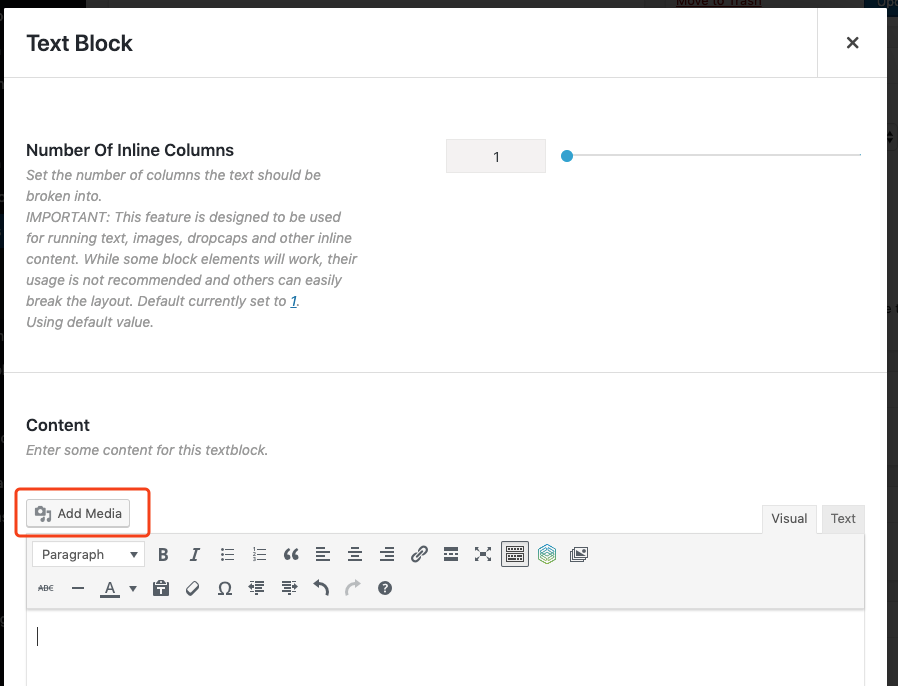
Then edit the added “Text Block” and click the “Add Media” button in the popup editor.
Then, just like uploading an image, upload and insert the video file. The effect after insertion is as shown below.
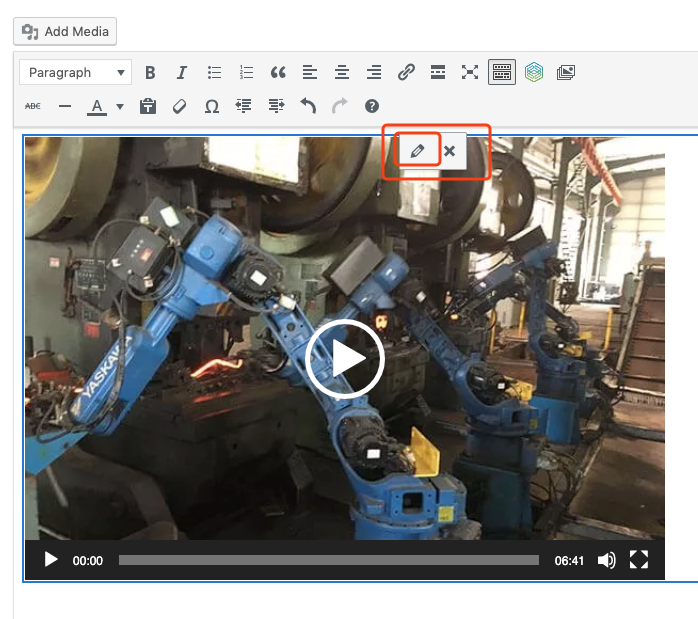
If you need to add a video cover image, click on the video file, and a pencil icon will appear on top (circled in the image above); click this pencil icon. The interface below will appear.
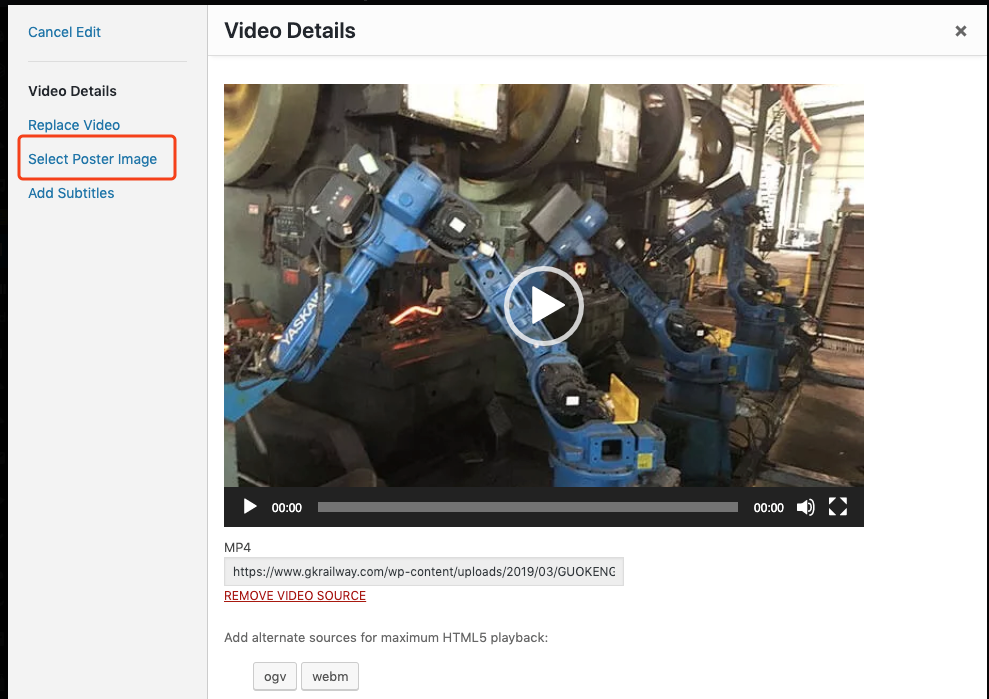
Click “Select Poster Image”, choose or upload an image in the appearing interface, then click “Select Poster Image” in the bottom right corner. Since this step is relatively simple, I won’t provide another screenshot here.
| Importance | 10 points |
| Difficulty | 1 |
After a round of optimizations as described above, you’ll find your site’s opening speed significantly faster. After a day or two, check the traffic statistics, bounce rates, and pages per session—these parameters will surely see some improvement.