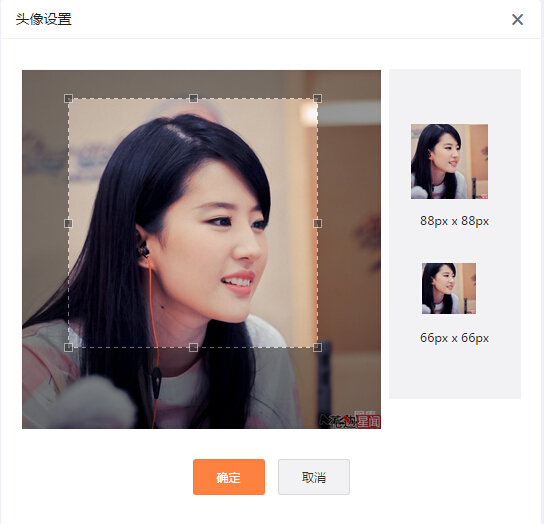
When building a WordPress user center, we often need users to upload a custom image from the front end and use it as an avatar. Many users are not technical, so asking them to crop the image to the correct size before uploading is not realistic. To improve the user experience, I spent quite a while testing different approaches and eventually finished a workflow that lets WordPress users upload and crop an image from the front end. The upload part uses the jQuery Ajax Upload plugin, and the cropping part uses jQuery Jcrop. Both are mature plugins with relatively good browser compatibility. The result looks like this:
Functions used for uploading and cropping images
To handle the uploaded image, I used a WordPress upload helper class called MediaUpload that I found on GitHub. The other processing steps use the following WordPress functions provided by core:
update_user_meta: adds or updates user meta, mainly used here to store the uploaded image as the user’s avatar.wp_get_attachment_url: gets the avatar image URL.wp_get_attachment_metadata: gets the uploaded image metadata so the cropped image can be processed further.wp_upload_dir: gets the WordPress upload directory, which is needed when saving the cropped image.wp_get_image_editor: gets the image editor instance. This is the main function used to crop the image.
Save images uploaded with Ajax
This step uses the MediaUpload class and is relatively straightforward. We only need to create a new MediaUpload instance and assign the image passed in through Ajax to that instance. After the image is saved, the function returns an attachment ID. We then store that ID in user meta as the value of the custom avatar field.
// 引入上传图片辅助类
include_once( 'MediaUpload.php' );

/*Ajax上传图片*/
add_action( 'wp_ajax_upload', 'ajax_upload' );
add_action( 'wp_ajax_nopriv_upload', 'ajax_upload' );
function ajax_upload() {

	$current_user = wp_get_current_user();
	$uid = $current_user->ID;

	$tmp = new MediaUpload;

	if ( $_FILES ) {
		foreach ( $_FILES as $file => $array ) {
			$newupload = $tmp->saveUpload( $field_name=$file );
		}
	}

	update_user_meta($uid, 'cus_avatar', $newupload['attachment_id']);

	$res = array(
		'id' => $newupload['attachment_id'],
		'url' => wp_get_attachment_url($newupload['attachment_id'])
	);

	echo json_encode($res);

	die(); //停止执行
}
Use Jcrop to crop the original image and save it to the WordPress uploads directory
The main difficulty in this step is retrieving the image name and the upload directory. Many people may run into trouble here. I also had to test for a long time before getting it right. The code below is tested and can be used directly.
/*Ajax上传图片*/
add_action( 'wp_ajax_subcorp', 'subcorp_img' );
add_action( 'wp_ajax_nopriv_subcorp', 'subcorp_img' );
function subcorp_img() {

	/*获取用户id*/
	$current_user = wp_get_current_user();
	$uid = $current_user->ID;

	/*获取上传的字段*/
	$src1 = $_POST["goods_img"];
	$src_x = $_POST["x"];
	$src_y = $_POST["y"];
	$src_w = $_POST["w"];
	$src_h = $_POST["h"];

	/*获取上传目录名和文件名*/
	$wp_upload_dir = wp_upload_dir();
	$img_meta = wp_get_attachment_metadata($src1);
	$img_file = $wp_upload_dir['basedir'] . '/' . $img_meta['file'];

	/*保存裁剪后的图片到上传目录*/
	$image = wp_get_image_editor( $img_file );
	if ( ! is_wp_error( $image ) ) {
		$image->crop( $src_x, $src_y, $src_w, $src_h, $dst_w = $src_w, $dst_h = $src_h, $src_abs = false );
		$new_name = $image->generate_filename();
		$image->save($new_name);
	}

	// 获取图片扩展名
	$filetype = wp_check_filetype( basename( $new_name ), null );

	// 准备插入附件
	$attachment = array(
		'guid'           => $wp_upload_dir['url'] . '/' . basename( $new_name ),
		'post_mime_type' => $filetype['type'],
		'post_title'     => preg_replace( '/.[^.]+$/', '', basename( $new_name ) ),
		'post_content'   => '',
		'post_status'    => 'inherit'
	);

	// 插入附件,并更新自定义头像字段
	$attach_id = wp_insert_attachment( $attachment, $new_name );
	update_user_meta($uid, 'cus_avatar', $attach_id);

	$corped_url = wp_get_attachment_url($attach_id);
	echo $corped_url;

	exit;
}
Besides custom avatars, the method introduced here can also be used for front-end featured image uploads or front-end gallery uploads with only minor changes. Because the front-end part does not involve much WordPress-specific logic, I will not go into detail here. If you have questions or a better approach, feel free to discuss it in the comments. And if implementing the feature feels too time-consuming, contact WordPress Zhiku for custom development.