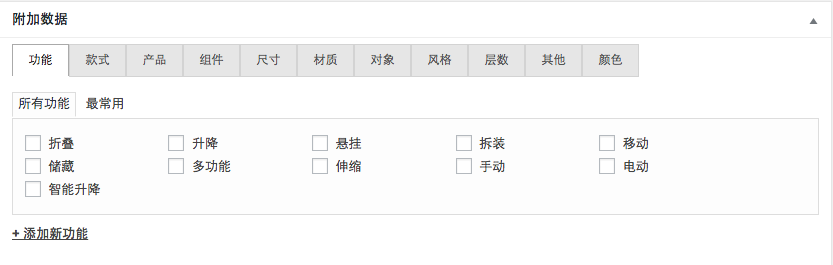
Custom taxonomies make WordPress content much easier to organize. The default post type already includes categories and tags, and we can attach as many additional taxonomies as we need. The problem is that every taxonomy gets its own box on the right side of the editor screen. When a post type has many taxonomies, editors have to keep scrolling down to find the one they need.
If we convert those taxonomy boxes into tabs, the interface becomes much easier to use. Instead of a long vertical stack of metaboxes, editors can switch between taxonomies with a single click.
Step 1: add a metabox to the target post type
First create a custom metabox. In the example below, wizhi_tabbed_box() is the callback that will render the tabbed interface. That callback is the key part of the whole solution.
add_action('add_meta_boxes', 'wizhi_add_import_box');

function wizhi_add_import_box() {
    $screens = array('post', 'page');

    foreach ($screens as $screen) {
        add_meta_box(
            'wizhi_tabbed_box',
            __('Additional Data', 'rhine'),
            'wizhi_tabbed_box',
            $screen,
            'side',
            'default'
        );
    }
}
Step 2: enqueue jQuery UI Tabs
WordPress already bundles the jQuery UI Tabs script, so we only need to enqueue it in the admin area.
add_action('admin_enqueue_scripts', 'wizhi_metab_enqueue_scripts');

function wizhi_metab_enqueue_scripts($hook) {
    wp_enqueue_script('jquery-ui-tabs');
}
Step 3: collect the taxonomy metaboxes and render them as tabs
This is the most important step. The callback gathers the taxonomy UI, builds the tab headings, and prints the content panels inside a single custom metabox.
function wizhi_tabbed_box($post) { ?>
    <div id="wizhi-tabs" class="ui-tabs">
        <ul id="tabs-title" class="nav-tab-wrapper clearfix"></ul>
        <div id="tab-content" class="tab-content"></div>
    </div>

    <script>
    jQuery(document).ready(function ($) {
        $('#wizhi-tabs').tabs();

        $('.taxonomydiv').each(function (index) {
            var box = $(this);
            var title = box.find('h3, h2').first().text();
            var tabId = 'taxonomy-tab-' + index;

            $('#tabs-title').append(
                '<li><a href="#' + tabId + '" class="nav-tab">' + title + '</a></li>'
            );

            $('#tab-content').append(
                '<div id="' + tabId + '">' + box.html() + '</div>'
            );

            box.hide();
        });
    });
    </script>
<?php }
Copy the code into your theme’s functions.php file or into a plugin, then refresh the post editor screen. The effect is mostly handled by JavaScript, so it is usually lightweight and unlikely to create compatibility problems.
If you prefer a plugin-based approach, Piklist Workflow can do something similar, but at the time of writing it was not stable enough for production use.